Another cute teacher card! Go check out Cut and Create for these cute little Apple tags!
Friday, April 30, 2010

One more Teacher Appreciation Idea
 Have you ever hear of Bake it at 350? Such a cute sight! My friend Shelley turned me onto it and it is full of awesome goodies and ideas! It makes me hungry just thinking about it! We are going to make these next week! They have the toppers as a free download!
Tuesday, April 27, 2010
Teacher Appreciation Week Gifts and Ideas
The first full week of May is Teacher Appreciation Week! Teacher appreciation day is May 4th. I don't think that limiting your appreciation should be stopped at teachers, but should include the faculty at the school. The principal, the office ladies, the school counselor! Anyone who helps to ensure that your child has a healthy educational experience. That doesn't mean go crazy! Here are some fun, easy and cheap ideas I've gathered for this years appreciation week!
 Sometimes it's as simple as writing a heart felt, thank you note! I know that when I feel appreciatied, it makes a big difference in my day. Cottage Industrialist has this cute and free printable apple card available on their site. Print this off, add a little note and maybe a gift card to Barnes and Noble.
 No Fuss Fabulous, had this great idea! Make a pencil bouquet and give this cute and free printable card to your teacher! They also have a darling, Smore basket with a free down loadable card! Darling stuff!
 Parties by Hardie has this cute little wreath and a few other great ideas!
 Sometimes it's as simple as writing a heart felt, thank you note! I know that when I feel appreciatied, it makes a big difference in my day. Cottage Industrialist has this cute and free printable apple card available on their site. Print this off, add a little note and maybe a gift card to Barnes and Noble.
 No Fuss Fabulous, had this great idea! Make a pencil bouquet and give this cute and free printable card to your teacher! They also have a darling, Smore basket with a free down loadable card! Darling stuff!
 Parties by Hardie has this cute little wreath and a few other great ideas!
Skip to My Lou has a huge list, of easy things that you could throw together this weekend. Also in this post, you can find some fun printable ideas. I love free printables. Always makes things so much easier!
How Does She has a great little list, with a free printable card.
Tip Junkie, has a big list of teacher gifts. And these right here, are what I will be doing for my teachers and administrators! Go check out this post, from Eighteen25, (which is my new favorite blog, by the way) and get some easy, easy ideas that you can put together this weekend and that won't cost you a fortune! I love these, because you could use them for a huge variety of events. For primary teachers, for visiting-teachers and friends. You name it. Lot's of great ideas!
 And these right here, are what I will be doing for my teachers and administrators! Go check out this post, from Eighteen25, (which is my new favorite blog, by the way) and get some easy, easy ideas that you can put together this weekend and that won't cost you a fortune! I love these, because you could use them for a huge variety of events. For primary teachers, for visiting-teachers and friends. You name it. Lot's of great ideas!
Oh Baby Centerpiece
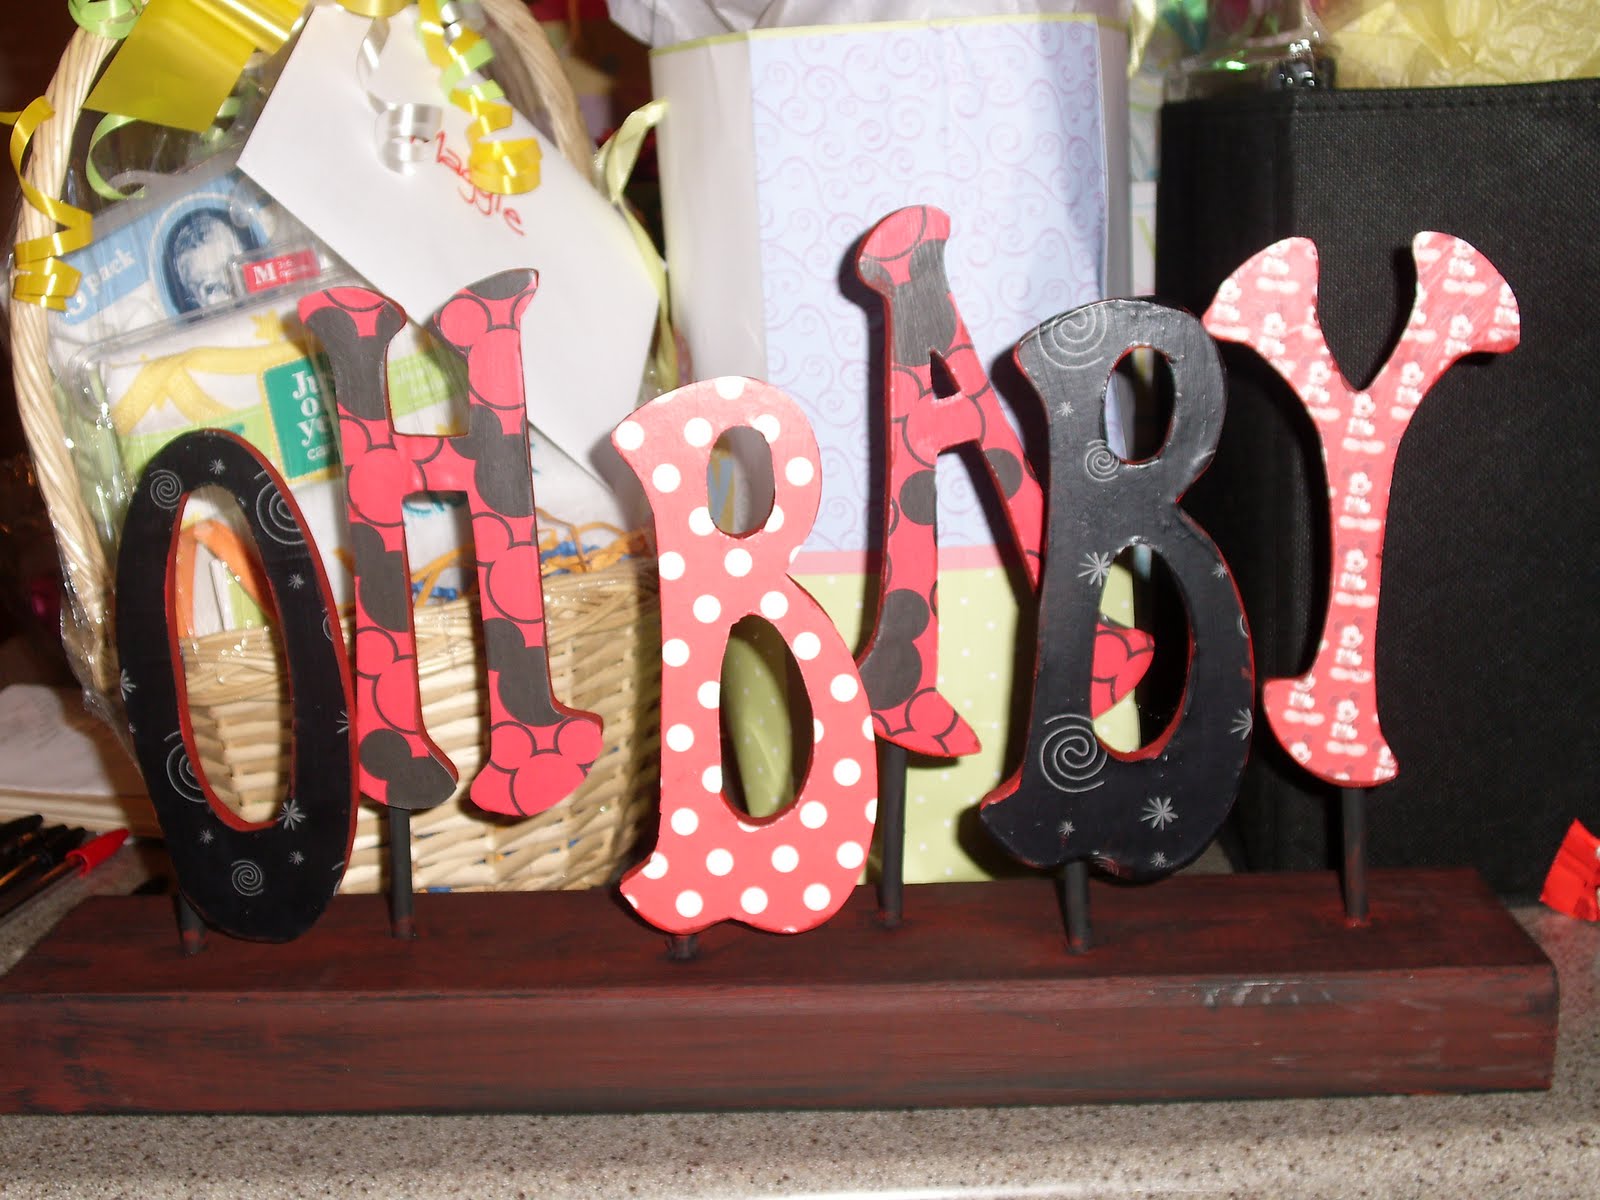 I got the idea for this little jem at Real Parties. I took the idea and made it my own. This was a fairly inexpensive little project. I got the letters at Joannes for $1.29. Then my sister-in-law, Kris and Mandee and I got together and modge podged the letters with cute paper.
Now, I have to say, I wanted to make this in fun pastel prints so it would match the shower. But the mommy-to-be is a Mickey Mouse addict and her nursery is in Mickey Mouse. So Mandee suggested making it as a gift, so she could put it in the baby's room! Great idea! And that is the explanation for the dark colors!
I should have taken pictures of each step. Sorry! I used a 2x4 for the base and cut it 1 and 1/2 feet long. Then I sanded it a little bit. I cut the dowels, and I didn't measure them. I just cut 3 of each. Then I used a 1/4 inch drill bit to drill the holes. I laid each of the letters out and marked where I wanted to put each hole.
When you finish with that, put our dowels in and use a hammer to get a tight fit. Then I painted everything black and dry brushed a layer of red over the top of the base. I just used hot glue to attach the letters.
Super cute!!
Monday, April 26, 2010
Pinwheel Centerpieces

Our theme for this baby shower was spring.
Lot's of pastel colors,flowers and pinwheels.
Look closely at the table, there are tons of little 2 inch pinwheels on the table.
We had planned on making these for napkin rings,
but we ran out of time, so we just scattered them on the table.
It looked really cute.
The tins were empty Stephen's Cocoa Honeyville Farms smoothie mix cans.
We just modge podged coordinating paper to the tins.
So cute and easy!
To make the little pinwheels we cut the paper to 2 inch squares.
Then simply cut the four corners in at about 1 inch deep.
Then you fold the four corners down and glue them.
We used buttons to put at the center.
The big pinwheel is a 6 inch square.
We attached flat thumbtacks to the back.
We painted regular #2 pencils, for the stick.
Stick your thumbtack in the eraser and your done!
They are functional and spin.
Add some craft foam in the bottom of the tins
and top that with some shredded paper!!
These could be used for a variety of things.
Heck, my kids love pinwheels.
It's a great afternoon craft!
Saturday, April 24, 2010
I'm Linking Up
I linked up one of my fun projects. Go check out some great ideas from lot's of other talented ladies!
Oh, and just wait until next week! I've got a big baby shower today and I didn't want to post pictures of the darling things that have been made, because I didn't want the mommy-to-be to see them! There is some good stuff! See you next week!
Thursday, April 22, 2010
Pudding and Cool whip Pops

Pudding Pops:
Mix 1 small box of pudding with 2 cups of milk. . Put a small scoop into a small cup. Add a scoop of cool whip on top of that and then top with more pudding. Insert Popsicle sticks and freeze.
To eat, pull out of freezer and run warm water around the cup to release the pop from the paper cup.
We also make these and use our morning smoothies to make a healthy afternoon treat. The kids love the soft layer of cool-whip in the middle of the pop.
Wednesday, April 21, 2010





Tuesday, April 20, 2010
Pudding Chocolate Chip Cookies
These are the best cookies. So soft and sweet. I've had this recipe in my binder for years. I copied it down out of an old cook book that a friend of mine had.
1 cup butter
3/4 cup brown sugar
1/4 cup white sugar
1 box vanilla/butterscotch pudding
1 tsp. vanilla
2 eggs
2& 1/4 cups flour
1 tsp. baking soda
2 cups chocolate chip (I do 1/2 choc. and 1/2 butterscotch)
Cream butter and sugars together. Add eggs and vanilla. Blend until well blened. Add the rest of the ingredients and stir until well blened. Bake at 350 for 10-12 minutes.

1 cup butter
3/4 cup brown sugar
1/4 cup white sugar
1 box vanilla/butterscotch pudding
1 tsp. vanilla
2 eggs
2& 1/4 cups flour
1 tsp. baking soda
2 cups chocolate chip (I do 1/2 choc. and 1/2 butterscotch)
Cream butter and sugars together. Add eggs and vanilla. Blend until well blened. Add the rest of the ingredients and stir until well blened. Bake at 350 for 10-12 minutes.
Monday, April 19, 2010
Scrapbooker's dream sale!
**** This link has been fixed! Sorry!****
Go check out this blog! This is a St. George gal, who has decided to go digital with her scrapbooking and is selling all of her supplies and she even has a smokin' deal on a cricuit!! I actually bought a few things from her and went over today and picked them up. She has so much stuff! She is willing to ship and does take paypal, so it's worth going to check out. You defienlty won't be sorry!
Go check out this blog! This is a St. George gal, who has decided to go digital with her scrapbooking and is selling all of her supplies and she even has a smokin' deal on a cricuit!! I actually bought a few things from her and went over today and picked them up. She has so much stuff! She is willing to ship and does take paypal, so it's worth going to check out. You defienlty won't be sorry!
Saturday, April 17, 2010
DI Frame Extreme Makeover
This was pretty simple. I love this frame. I found at DI for $3.00.
 I wasn't really digging the Avocado picture. So I popped out the canvas. Attempted to find some glass to fill in the frame. Which took me months, mind you. I eventually had my husband cut some down with this teeny tiny glass cutter we have.
I originally wanted to leave the frame white, because I thought it had a tone of character, but in the meantime I rearranged my living room and the white frame, just wasn't working for where I wanted it. So I sanded it down a bit, painted black over the top of it and then sanded it down to give it a vintage look.
I used some E-6000 (Walmart craft section), which is an industrial strength glue, to glue the glass into the frame. I had purchased my vinyl from Scribble It months ago and when it was all ready, simply laid the vinyl on and here is the finished product.
 I am in love with it! I know the vinyl is on a bit crooked, my hubby reminds me often, but it has a lot of character. I am making something similar, but on a much larger scale from a sister-in-law. I love refurbishing DI treasures!
 I wasn't really digging the Avocado picture. So I popped out the canvas. Attempted to find some glass to fill in the frame. Which took me months, mind you. I eventually had my husband cut some down with this teeny tiny glass cutter we have.
I originally wanted to leave the frame white, because I thought it had a tone of character, but in the meantime I rearranged my living room and the white frame, just wasn't working for where I wanted it. So I sanded it down a bit, painted black over the top of it and then sanded it down to give it a vintage look.
I used some E-6000 (Walmart craft section), which is an industrial strength glue, to glue the glass into the frame. I had purchased my vinyl from Scribble It months ago and when it was all ready, simply laid the vinyl on and here is the finished product.
 I am in love with it! I know the vinyl is on a bit crooked, my hubby reminds me often, but it has a lot of character. I am making something similar, but on a much larger scale from a sister-in-law. I love refurbishing DI treasures!
Take some time to go and check out Scribble It. I have bought vinyl from Cammi several times and have alway's been happy with it. I love, love, love the metal nativity, which I bought this past year! It's a great sight with lot's of fun ideas!
Friday, April 16, 2010
3-D Poppy Picture
Okay, so I made this using the Poppy's from yesterday! I think it's stinkin' cute. My husband thinks I'm a dork, but he totally helped me make it. He cut the dowel for me and even glued them into the frame. I told him I could do it, but he loves me and wants to help me with my wacky ideas!
 There is no glass in the frame and it kinda pops off the wall. Hard to tell in a picture, since you can't make it 3 dimensional.
I just had the unfinished frame in my closet forever. I started this thinking about using it for a decoration for a spring baby shower, but I don't know that it is necessarily the direction we wanted to go. We have another idea for that, but I still finished it because I had started it.
 There is no glass in the frame and it kinda pops off the wall. Hard to tell in a picture, since you can't make it 3 dimensional.
I just had the unfinished frame in my closet forever. I started this thinking about using it for a decoration for a spring baby shower, but I don't know that it is necessarily the direction we wanted to go. We have another idea for that, but I still finished it because I had started it.
What do you think?
Thursday, April 15, 2010
No Sew Felt Poppy Clips - Tutorial
 These are stinkin' cute! I have made poppies out of fabric before and had them turn out okay, but it was a complicated process with using a pattern and cutting them all out and it took forever. I made 3 of these in just under 20 minutes. They are that simple. I had a friend teach us how to make these at a Young Women's activity, but she had us sewing them together. I have made some like that, but using the glue gun is so much easier and they seem to hold up the same.
 Your going to need 6 circles cut out of felt, all the same size. These are 2 inches in diameter. I used a pattern that I had already made for silk flowers. Which will be hopefully posted on here next week!
 Your going to take a piece and fold it in half. You may want to put a dab of glue right in the center of that crease. I don't do that on every one, but sometimes they do unfold. Up to you!
 Then fold it in half again and stick a dot of glue in the fold to hold the petal in place. You will have a triangle shape petal.
 Take one of your pieces of felt and put a dot of glue and glue your petal on. Repeat this step with the other 3 circles. I like to do the first two petals right across from each other and then fill in the gaps with the other 2 petals.
 This isn't a great picture, but this is what it will look like. If you have any edges sticking out, you will just want to trim them off. You can leave it just like this, or.......
 Glue a cute button into the center. I love buttons! Place your last piece of felt in between the prongs of your hair clip. Smother the top of the felt with hot glue and attach it to the back of your flower.
This is seriously so easy and so cute! You can use them to embellish, purses, clothes, and just about anything you want. Tomorrow I am going to show you another use for them!
Wednesday, April 14, 2010
New Moon Cupcake Picks

I made these for a baby shower! That's right folks, a baby shower. My friend Shelley asked me to help her out and make some cupcakes for a baby shower she was throwing, the day that New Moon came out.
 I think they turned out way cute! I only did Edward, because both Mommies-to-be were Edward fans.
 I saw the idea to use forks as the picks somewhere online. I can't remember, but it was on several different sights. We cut about half the handle off the forks off so they wouldn't be so long. I got the silhouette graphic from Pin and Paper. Everything else I made using Lettering Delights products. It is seriously one of my favorite places to get fonts and I buy the graphic kits too, because they are super cute. (And they have lot's of freebies!!) I was able to get these during their dollar day's sale! I bought all of the Twilight fonts and the Edward and Jacob graphic sets. The twilight and Team Edward picks, I just made up with my fonts.
 I think they turned out way cute! I only did Edward, because both Mommies-to-be were Edward fans.
 I saw the idea to use forks as the picks somewhere online. I can't remember, but it was on several different sights. We cut about half the handle off the forks off so they wouldn't be so long. I got the silhouette graphic from Pin and Paper. Everything else I made using Lettering Delights products. It is seriously one of my favorite places to get fonts and I buy the graphic kits too, because they are super cute. (And they have lot's of freebies!!) I was able to get these during their dollar day's sale! I bought all of the Twilight fonts and the Edward and Jacob graphic sets. The twilight and Team Edward picks, I just made up with my fonts.
I used a 2 &3/4 inch punch to cut them out. Then I thought they were to plain, so I just took a red and black stamp pad and went crazy smudging the edges. I think my favorite one is the Volvo, that say's "stupid shiny Volvo owner,"
I also toyed around with just putting quotes on the picks, but it just didn't feel right. I seriously agonize over making things for other people. It gives me major anxiety, but I think they turned out pretty cool!!
Tuesday, April 13, 2010
Frame a Birdie
I have a birthday this week. A big one!! Well, I think it's big, it was big enough for Mandee to throw me a surprise party this weekend! And when I say party, I mean, sit down formal dinner, slide show and the whole 9-yards. It was amazing! And I happen to be the dumbest person ever on the face of the planet. There will be pictures to come, because she and my sister-in-law's put in so much work and it was beautiful! Had I known, I would have taken my camera, but being that it was surprise, no such luck so now I am waiting on pictures!
Anyway, back to my birthday. I went home last weekend and got a few presents early. My cute sister, Sherry, made this for me! She knows I love vintage birdies and silhouettes.
 She got the idea off of this post on Eighteen 25. Instead of using scrapbook paper, she used material and felt. It is darling!! So bright and springy! My brother-in-law even got involved. He sketched the birdie for me! Thanks sis!!!
Anyway, back to my birthday. I went home last weekend and got a few presents early. My cute sister, Sherry, made this for me! She knows I love vintage birdies and silhouettes.
 She got the idea off of this post on Eighteen 25. Instead of using scrapbook paper, she used material and felt. It is darling!! So bright and springy! My brother-in-law even got involved. He sketched the birdie for me! Thanks sis!!!
Monday, April 12, 2010
Foamerator
I saw this idea on Family Fun and had to try it. They call it the Foamerator. It was simple super to make! Simply cut the bottom off of a water bottle. Then attach a piece of towel to the bottom of the bottle and secure it with a rubber band. Dip the end in water, then into a shallow bowl filled with dish soap and then blow!!
 My 2-year-old loved it.
 The 11-year-old loved it.
 The 7-year-old sucked the bubbles into his mouth somehow and proceeded to gag and choke for at least 10 minutes.
 And the 5-year-old started a bubble fight. The kids had fun throwing the big suds on each other and smearing them everywhere. I would say they played with this for over an hour.
 My 2-year-old loved it.
 The 11-year-old loved it.
 The 7-year-old sucked the bubbles into his mouth somehow and proceeded to gag and choke for at least 10 minutes.
 And the 5-year-old started a bubble fight. The kids had fun throwing the big suds on each other and smearing them everywhere. I would say they played with this for over an hour.
We kept our bottles so we can play with them again. It's definitely a fun summertime activity. Next time we will break out the sprinkler and the swimsuits before we suds up!
Friday, April 9, 2010
(Sugar Free) No Bake Cookies
I'm on a quest to compile a recipe book full of healthy cookies and goodies!!! Is that possible? I made these the other day and they were so good! They don't harden up the way a normal no bake cookie does. They are pretty soft, but so good! Just a bit crumbly.
I took my original recipe and played around a bit with the measurements. I got about 18 cookies out of this patch. The almonds were an after thought, just to make it a little bit healthier! For the most part, I think this is a pretty healthy cookie!!
1/4 to 1/2 cup peanut butter, depending on taste
2 and 1/2 cups rolled oats
1/2 cup sliced almonds
Melt butter in a pan. Mix in Xagave, milk and cocoa. You will need to whisk it until the cocoa is blended and no lumps are in the sauce. Bring to a boil and boil for 1 minute. Take off burner and stir in peanut butter until smooth. Stir in oatmeal and almonds. Drop by spoonfuls onto waxed paper and let cool.
I took my original recipe and played around a bit with the measurements. I got about 18 cookies out of this patch. The almonds were an after thought, just to make it a little bit healthier! For the most part, I think this is a pretty healthy cookie!!

Sugar Free No Bake Cookies
1/4 cup butter or margarine
2/3 cup Xgave, or could use 1/2 cup splenda brown sugar
1/4 cup milk
2 Tbsp. + 2 Tsp. cocoa powder1/4 to 1/2 cup peanut butter, depending on taste
2 and 1/2 cups rolled oats
1/2 cup sliced almonds
Melt butter in a pan. Mix in Xagave, milk and cocoa. You will need to whisk it until the cocoa is blended and no lumps are in the sauce. Bring to a boil and boil for 1 minute. Take off burner and stir in peanut butter until smooth. Stir in oatmeal and almonds. Drop by spoonfuls onto waxed paper and let cool.
Homemade French Fries & Secret Hamburger sauce
 MMMMMMM! These were another Hoover's secret! Homemade, greasy french fries! Divine when dipped in the secret sandwhich sauce, which I am going to share with you today. It's so simple, it's unbelievable.
You need, Mustard, Mayo and pickle relish. I don't remember ever making it up with a recipe, it was just throw everything together and make it up until it tasted right. We would serve a thick layer of this on the bottom of the bun, a sprinkling of shredded lettuce, and then the meat. We made a mean bacon cheeseburger! Then top with the other half of the bun. No ketchup, just this famous hamburger sauce!
Thursday, April 8, 2010
Homemade Chicken Fried Steak

When I was growing up, I worked as a waitress in this little cafe, Hoover's. It had been around since the 1920's and it was the coolest place to work. The secret to their success was homemade chicken fried steak and this to die for hamburger sauce! I will have to share that one of these day's. It was heavenly!
Anyway, I can't stand to order chicken fried steak at a restaurant because I hate those yucky frozen, deep-fried patties! GAG ME! But this, is one of those things I make when I am looking for comfort food. And they are pretty easy.
Cube Steak, enough for your family
eggs
bread crumbs, I use stuffing
seasonings and lot's of butter
Take your cube steak and tenderize it by pounding it out with a meat mallet. Take your eggs and whip them for an egg coating. Dip steak in egg and then cover in bread crumbs. Fry your steaks in a pan that is heavily coated in butter. Before you flip each steak, put more butter down or you will burn your steak.
Cook thoroughly and enjoy! Don't make this alot because it is defiently not healthy, but it's sure delicious!
Wednesday, April 7, 2010
Spaghetti & Meatball Cupcakes
 I think these are pretty cute. My cute neighbor, Ashley, who is only 13 made them for a family party a few weeks ago. She brought a plate of them over to us and I thought it was such a cute idea.
They dyed the white frosting with yellow food coloring and some how cocoa powder was involved. Not sure on that detail. But you just take the frosting and swirl it all crazy over the top. Then you add spoonfuls of strawberry jam for your sauce. Top with a whopper and grate a little white chocolate on top for Parmesan cheese!
So cute. The girl's got talent!
Tuesday, April 6, 2010
Flourless Peanut Butter Cookies
Hmmm, these were tasty! A bit crumbly, but super yummy! I just came off another round of HCG and am looking for recipes to make. The kids wanted cookies on Sunday so I tried this recipe and of couse had to cheat and try a cookie! I want to try and make them with Splenda and see how they are. I guess I need to run to the store for some white sugar Splenda and try it. They were also very flat and they spread a bunch on the pan, but who cares if they are pretty as long as they taste good!


Flourless Peanut butter Cookies
1 cup all-natural chunky or smooth peanut butter
1 cup sugar (1/2 cup brown sugar and 1/2 cup granulated sugar)
1 egg
1 teaspoon baking soda
Preheat oven to 350 degrees F. Grease a baking sheet with butter and set aside. In a mixer combine peanut butter and sugars until well combined, about 2 minutes. Add egg and baking soda and mix for another 2 minutes. Roll into walnut sized balls and create a cris-cross pattern with a fork. If Bake for 10 minutes, until lightly browned. Cool on a baking sheet for two minutes.
1 cup sugar (1/2 cup brown sugar and 1/2 cup granulated sugar)
1 egg
1 teaspoon baking soda
Preheat oven to 350 degrees F. Grease a baking sheet with butter and set aside. In a mixer combine peanut butter and sugars until well combined, about 2 minutes. Add egg and baking soda and mix for another 2 minutes. Roll into walnut sized balls and create a cris-cross pattern with a fork. If Bake for 10 minutes, until lightly browned. Cool on a baking sheet for two minutes.
Recipe, via Joy of Baking
Thursday, April 1, 2010
I Need other Mom's Advice
Okay, this will have to be quick. We are going out of town for the Easter weekend, but I have a parenting problem, that I'm not sure how to deal with.
My oldest is almost 8. He's a cute kid and a lot of fun. But he is super sensitive. About everything. He gets his feelings hurt very easily and he cries. Which, as a boy, gets him teased by his peers at school. It seems to be getting worse, although the boy is a closed book. I have to pry any information that I get out of him by force. And it usually results in tears. Mandee's little gal is in the same class and she has told Mandee that kids are really mean to J.D., because he howls like a wolf and he cries when kids don't want to play with him.
I'm at a loss of how to approach this. I've tried just talking to him, but it doesn't seem to be helping. It is getting worse. Every day is the worst day of his life. I can tell it's because he is feeling isolated. My husband just keeps telling him to grow up and stop crying and kids will play with him, but I don't think that is necessarily the right approach. It doesn't seem to be helping, anyway.
I think this is the hardest part of being a mother. The momma bear in me comes out and I just want to protect him, but I know this is something we have to work out together and he needs to take care of. Otherwise, it's going to get worse as he gets older.
I'm curious to all of you seasoned, and all of you who are fairly newbies like me, how would you handle this? Any advice would be greatly appreciated. Thanks!
My oldest is almost 8. He's a cute kid and a lot of fun. But he is super sensitive. About everything. He gets his feelings hurt very easily and he cries. Which, as a boy, gets him teased by his peers at school. It seems to be getting worse, although the boy is a closed book. I have to pry any information that I get out of him by force. And it usually results in tears. Mandee's little gal is in the same class and she has told Mandee that kids are really mean to J.D., because he howls like a wolf and he cries when kids don't want to play with him.
I'm at a loss of how to approach this. I've tried just talking to him, but it doesn't seem to be helping. It is getting worse. Every day is the worst day of his life. I can tell it's because he is feeling isolated. My husband just keeps telling him to grow up and stop crying and kids will play with him, but I don't think that is necessarily the right approach. It doesn't seem to be helping, anyway.
I think this is the hardest part of being a mother. The momma bear in me comes out and I just want to protect him, but I know this is something we have to work out together and he needs to take care of. Otherwise, it's going to get worse as he gets older.
I'm curious to all of you seasoned, and all of you who are fairly newbies like me, how would you handle this? Any advice would be greatly appreciated. Thanks!
Wednesday, March 31, 2010
I need a Favor
 I feel bad even putting this on this blog. I mean, I feel really strange, it's really my husbands idea, and I mean, we're friends right???
My little sweetie is in a cute baby contest. There are only 10 contestants so our odds are pretty good. We are trying to win a photo session from the very talented Deborah Harroun. I live 4 hours away from her, but I'm willing to travel because I am so impressed with her work. If you have a minute, would you please go and vote for her? I would appreciate it so much. You can vote once a day on her website and if your live in Utah, you should visit her facebook page and become a fan. That is how I found out about this contest. Then if you become a facebook fan, you could vote on that page to. You can vote their once a day also.
Click here to vote for cute #3.
But please, don't feel obligated to vote. Only if you would like to help, and we would really appreciate it. Thank you so much!!
Tuesday, March 30, 2010
Jelly Bean Jewlery

Simply string a needle with heavy duty thread or dental floss. Tie a knot in the end leaving enough of a tail to tie it off at the end. And let the kids string them on. They are a big tough to get the need through. We had pretty big jelly beans. Next time I would probably go with smaller. My 5-year-old was even able to do this. Although, it was taking him forever to get them on, so I ended up helping in the end. I made my 2-year-olds while she handed me sticky sucked on jelly beans! But the 3 older kids, did fabulous and did it all by themselves. This would be a craft from about Kindergarten up. It does get a bit sticky! But that is half the fun!

Monday, March 29, 2010
Cute Easter Activities
 Aren't these darling? I printed the template for this off their blog. I gave these all of my Young Women yesterday and they loved them!! So cute! Everyone who saw them loved them! I ended up printing them out in a 5x7 size. I just printed them and the toppers were way to big. 5x7 was just right. The big ones are going to be stuck to a box of peeps and left on the lawns of those we are egging tonight.
 I actually got this picture off their blog. How cute is that sign? I have mine all printed and ready to go for Family Home Evening tonight! My kids and I stuffed the eggs last night and we've got our targets picked and we're ready to go egging!
Go check out their blog. You will seriously fall in love with all the fun ideas!
Thursday, March 25, 2010
Tired
Hello everyone! I started this week off with the best of intentions. I have so many projects, just waiting to be finished and I've got a tutorial in the making, and a few other projects to blog, but dang it all, I'm beat! I recently started working at my son's preschool with the most fabulous teacher's ever! I am really enjoying it and it's giving me oodles of ideas. This week was super hero week and it's just about wore me out! I've spent the last 2 weeks working much more than usual. That coupled with watching my neighbor girl all week, while her dad is away and my general responsibilities. You know, the cooking, the cleaning, the accounting, the chauffeuring, the babysitting and all the things we all do every day have made me so tired. I hope I am back up and going next week.
If you hadn't noticed, Mandee hasn't been posting since December. And I'm all good with that, the girl is super busy!! Whenever she decides to hop back in, she's more than welcome! But to this point, I've been able to post a post a day! YEAH! I love it, but if I miss a day, then I feel guilty!!! I didn't start blogging to feel guilty, but as a hobby because i enjoy it. And let's face it, there are way more talented and awesome bloggers out there.
However, my point is, I am going to stop posting every day. I am going to try and post at least a couple of times a week. I have more daily reads to get up for you all! I've got lot's of projects, it's just a matter of doing it all. So, please stick around while I try to catch up with life and I will see you sometime next week!
If you hadn't noticed, Mandee hasn't been posting since December. And I'm all good with that, the girl is super busy!! Whenever she decides to hop back in, she's more than welcome! But to this point, I've been able to post a post a day! YEAH! I love it, but if I miss a day, then I feel guilty!!! I didn't start blogging to feel guilty, but as a hobby because i enjoy it. And let's face it, there are way more talented and awesome bloggers out there.
However, my point is, I am going to stop posting every day. I am going to try and post at least a couple of times a week. I have more daily reads to get up for you all! I've got lot's of projects, it's just a matter of doing it all. So, please stick around while I try to catch up with life and I will see you sometime next week!
Wednesday, March 24, 2010
Postcards for Satori
 This cute little girl is having a pretty big surgery next week. Her mom is looking for people to send her postcards from all around the world to help brighten her stay in the hospital. I think it's a pretty cool idea. To see her story and get the details go and visit her blog.
Tuesday, March 23, 2010
Scratch n' Sniff Paint
First of all, I am not sure where I got this idea. I honestly have no idea, I think it was Family Fun. I know it was awhile ago that I saw it. I din't bookmark it, but I am pretty sure it was there, but I can find it nowhere!! But if you know where it originated, please let me know so I can give proper credit. It's been filed away in the back of my brain for awhile.
All you need to do this craft is packages of kool-aid and water. I used about 1/2 a pkg. of kool-aid to 3 Tbsp. water. You can use more or less, depending on how thick you want to make it. This smells so yummy!! That is the best part. But be careful because it does stain hands and I am sure it does clothes too!
 Piper sniffing her paint. This may be a bad habit to form!! You will want to use cardstock because it did bleed through the paper quite a bit. We did cardstock after the first round of painting was done and it worked much better.
 Such an easy boredom buster. And the kids can enjoy smelling it for weeks!!
All you need to do this craft is packages of kool-aid and water. I used about 1/2 a pkg. of kool-aid to 3 Tbsp. water. You can use more or less, depending on how thick you want to make it.
 This smells so yummy!! That is the best part. But be careful because it does stain hands and I am sure it does clothes too!
 Piper sniffing her paint. This may be a bad habit to form!! You will want to use cardstock because it did bleed through the paper quite a bit. We did cardstock after the first round of painting was done and it worked much better.
 Such an easy boredom buster. And the kids can enjoy smelling it for weeks!!
Notice we also made Apple Jack necklaces. Sometimes I forget it's the simple things that kids enjoy so much. They had a blast making them and it was a great play date.
Monday, March 22, 2010
Rolled Flower Tutorial
I've had a few people ask me if I have any tutorials on flowers. Nope, but I said, I'd make one. And I remembered why I hadn't done a tutorial, they take forever!! But since I love you guy's, I did one up for the rolled flowers. I originally got this idea from a headband I bought a boutique. It's alot looser than the one's I have been making, but I really like these.
 They are so easy and so pretty.
 You'll need. Two felt circles that coordinate with your material. The bigger of the two is the one you will use as your base for the flower. Then your scissors and glue gun. You could also use fabric glue if you wanted to. I tried it and it didn't work nearly as well as the trusty old glue gun.
 Depending on the size you want your flower, your going to tear yourself a strip of material, about 1 to 1 & 1/2 inches wide. For this large flower, my fabric was 45 inches. For a tiny flower, you might only use about 12. I always figure that if I want to finish the flower off, I will just trim the excess material off.
 Put a dab of glue in the center of your felt. You can tie a knot in your material and place it onto the glue, or you can simply stick the material to the glue. I do it that way, because it makes it easier to put buttons into the center later on.
 Your going to take your material and start twisting it around itself. I do a few inches at a time.
 Then you simply start to roll it around the center piece and glue the fabric to itself. You can glue it directly to the felt, and you will want to do that every couple of times you glue, but not every time or else it gets to hard and not pliable.
 And from here, you just keep twisting and gluing until you get the desired size of flower you want.
 Sorry, I should have cropped this to get a closer picture. But here is what your back will look like when you are done. If you have extra felt sticking out, just trim it off.
 And this isn't a great shot either, but take the end of the material and simply tuck the ends into a the last twist you did and glue it.
 The best place I have found to get clips is to buy them at a beauty supply store, like Sally's. I got 100 clips for $5.00. But here you'll take your second felt circle and stick it in between the the prongs of the clip. Now put a liberal amount of hot glue to the top of the felt.
 Then stick it to the back of the flower. I put the felt in between the flower and the prongs because then you don't have to mess with getting the glue perfect and it doesn't get caught in your hair.
 Now add a button and glue it to the center and you have a darling rolled flower. These are super cute when attached to a headband. Like the Mellow Yellow headband I listed in the giveaway. They are also cute on clothes, bags, and just about anything else you can think of. I have another project to show you with these, but I don't want to give anything away!!
 They are so easy and so pretty.
 You'll need. Two felt circles that coordinate with your material. The bigger of the two is the one you will use as your base for the flower. Then your scissors and glue gun. You could also use fabric glue if you wanted to. I tried it and it didn't work nearly as well as the trusty old glue gun.
 Depending on the size you want your flower, your going to tear yourself a strip of material, about 1 to 1 & 1/2 inches wide. For this large flower, my fabric was 45 inches. For a tiny flower, you might only use about 12. I always figure that if I want to finish the flower off, I will just trim the excess material off.
 Put a dab of glue in the center of your felt. You can tie a knot in your material and place it onto the glue, or you can simply stick the material to the glue. I do it that way, because it makes it easier to put buttons into the center later on.
 Your going to take your material and start twisting it around itself. I do a few inches at a time.
 Then you simply start to roll it around the center piece and glue the fabric to itself. You can glue it directly to the felt, and you will want to do that every couple of times you glue, but not every time or else it gets to hard and not pliable.
 And from here, you just keep twisting and gluing until you get the desired size of flower you want.
 Sorry, I should have cropped this to get a closer picture. But here is what your back will look like when you are done. If you have extra felt sticking out, just trim it off.
 And this isn't a great shot either, but take the end of the material and simply tuck the ends into a the last twist you did and glue it.
 The best place I have found to get clips is to buy them at a beauty supply store, like Sally's. I got 100 clips for $5.00. But here you'll take your second felt circle and stick it in between the the prongs of the clip. Now put a liberal amount of hot glue to the top of the felt.
 Then stick it to the back of the flower. I put the felt in between the flower and the prongs because then you don't have to mess with getting the glue perfect and it doesn't get caught in your hair.
 Now add a button and glue it to the center and you have a darling rolled flower. These are super cute when attached to a headband. Like the Mellow Yellow headband I listed in the giveaway. They are also cute on clothes, bags, and just about anything else you can think of. I have another project to show you with these, but I don't want to give anything away!!
Hopefully this made sense and helps someone out. Happy flower making!
Subscribe to:
Posts (Atom)