Wednesday, March 31, 2010

I need a Favor

I feel bad even putting this on this blog. I mean, I feel really strange, it's really my husbands idea, and I mean, we're friends right???

My little sweetie is in a cute baby contest. There are only 10 contestants so our odds are pretty good. We are trying to win a photo session from the very talented Deborah Harroun. I live 4 hours away from her, but I'm willing to travel because I am so impressed with her work. If you have a minute, would you please go and vote for her? I would appreciate it so much. You can vote once a day on her website and if your live in Utah, you should visit her facebook page and become a fan. That is how I found out about this contest. Then if you become a facebook fan, you could vote on that page to. You can vote their once a day also.

Click here to vote for cute #3.

But please, don't feel obligated to vote. Only if you would like to help, and we would really appreciate it. Thank you so much!!

Tuesday, March 30, 2010

Jelly Bean Jewlery

This was one of the easiest projects and so much fun. We've attempted to make jewelry out of candy before, and failed miserably with candy corn. This was so easy and the kids loved making their own candy jewelry.

Simply string a needle with heavy duty thread or dental floss. Tie a knot in the end leaving enough of a tail to tie it off at the end. And let the kids string them on. They are a big tough to get the need through. We had pretty big jelly beans. Next time I would probably go with smaller. My 5-year-old was even able to do this. Although, it was taking him forever to get them on, so I ended up helping in the end. I made my 2-year-olds while she handed me sticky sucked on jelly beans! But the 3 older kids, did fabulous and did it all by themselves. This would be a craft from about Kindergarten up. It does get a bit sticky! But that is half the fun!
Posted by Picasa

Monday, March 29, 2010

Cute Easter Activities

Have you ever heard of Eighteen25? It's the coolest new blog on the block! They have so many great idea's over there. You have got to go and check them out. I love them so much, I think I am going to give them their own daily read! Seriously talnted ladies!

Aren't these darling? I printed the template for this off their blog. I gave these all of my Young Women yesterday and they loved them!! So cute! Everyone who saw them loved them! I ended up printing them out in a 5x7 size. I just printed them and the toppers were way to big. 5x7 was just right. The big ones are going to be stuck to a box of peeps and left on the lawns of those we are egging tonight.
I actually got this picture off their blog. How cute is that sign? I have mine all printed and ready to go for Family Home Evening tonight! My kids and I stuffed the eggs last night and we've got our targets picked and we're ready to go egging!

Go check out their blog. You will seriously fall in love with all the fun ideas!

Thursday, March 25, 2010

Tired

Hello everyone! I started this week off with the best of intentions. I have so many projects, just waiting to be finished and I've got a tutorial in the making, and a few other projects to blog, but dang it all, I'm beat! I recently started working at my son's preschool with the most fabulous teacher's ever! I am really enjoying it and it's giving me oodles of ideas. This week was super hero week and it's just about wore me out! I've spent the last 2 weeks working much more than usual. That coupled with watching my neighbor girl all week, while her dad is away and my general responsibilities. You know, the cooking, the cleaning, the accounting, the chauffeuring, the babysitting and all the things we all do every day have made me so tired. I hope I am back up and going next week.

If you hadn't noticed, Mandee hasn't been posting since December. And I'm all good with that, the girl is super busy!! Whenever she decides to hop back in, she's more than welcome! But to this point, I've been able to post a post a day! YEAH! I love it, but if I miss a day, then I feel guilty!!! I didn't start blogging to feel guilty, but as a hobby because i enjoy it. And let's face it, there are way more talented and awesome bloggers out there.

However, my point is, I am going to stop posting every day. I am going to try and post at least a couple of times a week. I have more daily reads to get up for you all! I've got lot's of projects, it's just a matter of doing it all. So, please stick around while I try to catch up with life and I will see you sometime next week!

Wednesday, March 24, 2010

Postcards for Satori

This cute little girl is having a pretty big surgery next week. Her mom is looking for people to send her postcards from all around the world to help brighten her stay in the hospital. I think it's a pretty cool idea. To see her story and get the details go and visit her blog.

Tuesday, March 23, 2010

Scratch n' Sniff Paint

First of all, I am not sure where I got this idea. I honestly have no idea, I think it was Family Fun. I know it was awhile ago that I saw it. I din't bookmark it, but I am pretty sure it was there, but I can find it nowhere!! But if you know where it originated, please let me know so I can give proper credit. It's been filed away in the back of my brain for awhile.


All you need to do this craft is packages of kool-aid and water. I used about 1/2 a pkg. of kool-aid to 3 Tbsp. water. You can use more or less, depending on how thick you want to make it. This smells so yummy!! That is the best part. But be careful because it does stain hands and I am sure it does clothes too!


Piper sniffing her paint. This may be a bad habit to form!! You will want to use cardstock because it did bleed through the paper quite a bit. We did cardstock after the first round of painting was done and it worked much better.


Such an easy boredom buster. And the kids can enjoy smelling it for weeks!!
Notice we also made Apple Jack necklaces. Sometimes I forget it's the simple things that kids enjoy so much. They had a blast making them and it was a great play date.

Monday, March 22, 2010

Rolled Flower Tutorial

I've had a few people ask me if I have any tutorials on flowers. Nope, but I said, I'd make one. And I remembered why I hadn't done a tutorial, they take forever!! But since I love you guy's, I did one up for the rolled flowers. I originally got this idea from a headband I bought a boutique. It's alot looser than the one's I have been making, but I really like these.
They are so easy and so pretty.
You'll need. Two felt circles that coordinate with your material. The bigger of the two is the one you will use as your base for the flower. Then your scissors and glue gun. You could also use fabric glue if you wanted to. I tried it and it didn't work nearly as well as the trusty old glue gun.

Depending on the size you want your flower, your going to tear yourself a strip of material, about 1 to 1 & 1/2 inches wide. For this large flower, my fabric was 45 inches. For a tiny flower, you might only use about 12. I always figure that if I want to finish the flower off, I will just trim the excess material off.
Put a dab of glue in the center of your felt. You can tie a knot in your material and place it onto the glue, or you can simply stick the material to the glue. I do it that way, because it makes it easier to put buttons into the center later on.

Your going to take your material and start twisting it around itself. I do a few inches at a time.

Then you simply start to roll it around the center piece and glue the fabric to itself. You can glue it directly to the felt, and you will want to do that every couple of times you glue, but not every time or else it gets to hard and not pliable.


And from here, you just keep twisting and gluing until you get the desired size of flower you want.

Sorry, I should have cropped this to get a closer picture. But here is what your back will look like when you are done. If you have extra felt sticking out, just trim it off.

And this isn't a great shot either, but take the end of the material and simply tuck the ends into a the last twist you did and glue it.
The best place I have found to get clips is to buy them at a beauty supply store, like Sally's. I got 100 clips for $5.00. But here you'll take your second felt circle and stick it in between the the prongs of the clip. Now put a liberal amount of hot glue to the top of the felt.
Then stick it to the back of the flower. I put the felt in between the flower and the prongs because then you don't have to mess with getting the glue perfect and it doesn't get caught in your hair.

Now add a button and glue it to the center and you have a darling rolled flower. These are super cute when attached to a headband. Like the Mellow Yellow headband I listed in the giveaway. They are also cute on clothes, bags, and just about anything else you can think of. I have another project to show you with these, but I don't want to give anything away!!
Hopefully this made sense and helps someone out. Happy flower making!

Friday, March 19, 2010

We have Winners

Sorry for the delay in announcing the winners of the giveaway! Ugh, we had a huge storm last night and it completely shredded the connections and wiring on my roof. So, I spent my day waiting for the cable guys to come and fix it. I could have kissed the repairman when he came and fixed it!!! But I didn't! Instead I consulted random.org and here are our winners!


The winners are...........
#12, Sleepless in St. George
#17 Sky and Aaron
#18 Kellie

CONGRATULATIONS!! If you ladies will get me your mailing info, you can email it to mandeeandbrandy@yahoo.com, I will get these in the mail for you on Monday! Thanks for participating. It was fun! See you next week with some fun new projects.

Thursday, March 18, 2010

600 Posts and a Giveaway

(This post will stay at the top until the giveaway is done. Please scroll down for new posts.)
CAN YOU BELIEVE IT?
600 POSTS in just over a year-and-a-half!
Who would've thought that we would have so much fun?
What originally was going to be a small little cooking blog,
turned into so much more! We've had a blast getting to know
all of you amazing ladies and sharing a bit of us with you.
We are just a small little blog, and I think we'll stay that way.
It's just fun to network and share ideas.
There are so many crafty ladies out there.
Thanks for sharing with us!
So now, let us share with you!
It's been awhile since we've had a giveaway.
A long while, but 600 posts is something to celebrate.
Look what you can win ~
All handmade with love by me!


I have a new obsession with fabric flowers. I LOVE them. You can wear them with anything! I love adding them to my hair on a simple jeans and t-shirt day. It gives it just a little bit extra and can totally change up your look! I was having a hard time deciding which set I like best. I am a headband addict, so I am in love with all 3 of the headbands. Good thing I have more material and can make more. My hubby wants me to open an etsy shop, but he doesn't understand that everyone is making and selling these. Besides, if I made it into work, it wouldn't be fun!

So since I couldn't decide, I will be giving away all 3 sets! Three lucky winners!!!! You have 2 chances for entries.

1. Leave a comment on this post between now and Thursday, 11:59 p.m. Please let us know why you come and visit us and what posts you have loved. Is there something you would like to see more of?? And tell me which of the 3 set's, you like the best. Winners will be drawn at random, and which set you get will be a surprise. I have them all boxed and ready to just stick addresses on. Oh man, I love surprises!

2. Be a follower. Make sure to leave a separate comment on this post for that extra entry.

I will be using Random.org and announcing our lucky winners on Friday morning.

You will have 1 week to claim your prize. If I haven't heard back from you in that time, I will have to pick a new winner. So make sure to check back
!

Thrift Store Finds

I LOVE to shop at DI. It is an absolute treat for me to go and see what I can find. Other people's junk is my treasure! I love all thrift store and yardsaling is even better. DI is getting kinda pricey, but yardsales! Oh my! Anyway, here are two of my wonderful finds this week. Sorry for the blurry pictures.
This whiteboard calendar was only $3.00. Seriously! All it needed was to have the board cleaned and the bottom needed some tigthening and it was good to go. I am loving it!! We put it up last night and I've already had to change a few things on it. It's also magnetic!! Seriously a great find.
This fun little mirror has me super excited. I found this for $8.00, which normally I may not have paid, but i have been looking for something like this for awhile and honestly, I'm tired of picking up my kids coats. Wheter or not I'll use it to hang coats or fun crafty decor, I don't really know! It was missing 1 hook, so I took one off and headed to Home Depot to try and match it. I ended up buyin all new hooks, but now I am trying to decide whether or not I want to sand it down and paint it black or leav it. My house is a mixture of black, tan and diffrent shades of natural wood, so either way it would work. And then, I'm also considering putting a vinyl saying on the mirror. Not sure exactly what I want to do.
What do you think?? Paint it or leave it? Vinyl or not?? I've also got a few projects going on, and I am hoping to get to them this weekend and post them next week. Keep your fingers crossed for me!!

Wednesday, March 17, 2010

Wanna Save Some Money?


Then you've got to go and visit this blog!! I found this through facebook. I became friends with a girl from my hometown and this is her blog! It's full of great coupons and saving! There is a fabulous 30% off coupon that you can print out right now and it is good at any Old Navey, Gap or Bannana Republic stores. It's good for 4 day's only, so hurry up and go print it off. It's good starting tomorrow. Spend some time checking out her blog, because she has some great tips on coupons and lot's of ideas for saving money!! That is one of my favorite things to do!


Her blog is full of great tips and lot's of good deals. It's defiently a must see and deserves it's own, daily read!!

Tuesday, March 16, 2010

St., Patricks Day

Ah, St. Patricks day is upon us! It's a fun little holiday. We've done a few projects this year for some holiday fun! Click here to check out all of our St. Patricks day fun! One of our traditions is to have Corn beef and cabbage for St. Patricks day! We all love it. That was a tradition carried over from my own family. I think this year I will be adding my rainbow cupcakes, for a treat and maybe a green float. Simply use lime sherbet and add some sprite! How fun is that!!! My sister has a tradition of leaving their shoes outside for the leprechauns and they fill the kids shoes with treats. Gold coins and little trinkets. Then those tricky leprechauns hid their shoes and the kids have to find them. Such a cute idea.

Whatever your traditions may be, don't forget to wear your green tomorrow!!!!

Friday, March 12, 2010

5 Daily Reads

Make sure to check back on Monday!

It's giveaway time!

600 posts baby!

Poppy


Adventures in Crafting

Thursday, March 11, 2010

Fluffy Shamrock

Cute, huh?? This was something I just came up with. I'm sure it's not very original, but I remember doing similar projects when I was kid.
First, print off the shamrock template. We used crepe paper, because it was easy to cut a lot of pieces into little squares, quickly. You could also use tissue paper.
Wrap your crepe paper around the end of a pencil. Dip the crepe paper into white glue and push down onto the template. Now repeat that step 100 times and you will get a fluffy, green shamrock!
My kiddo's didn't last long on this. If your child is meticulous really likes to do crafts, then it would work for them. Greta is 10 and she finished, but my 7-year-old little boy, didn't. Mandee's little girl Baylee, who is 7, she would have finished it to. It just depends on your child.

Wednesday, March 10, 2010

Rainbow Streamer

This was one of the easiest projects ever! Simply cut out the center of a paper plate. Let the kids color or decorate the plate rim as they wish.
Attach the crepe paper to the back. I only had 4 colors because that was all that my dollar store had. It would look much better with some purple and orange thrown it, but oh well.
Very easy for preschool age kids! The only thing I did was cut the center out of the plate. Now you have a cute rainbow streamer to help bring in St. Patrick's day!
This is a fun activity that could be adapted for any holiday really. I got this idea from Enchanted Learning.

Tuesday, March 9, 2010

Kissing the Blarney Stone

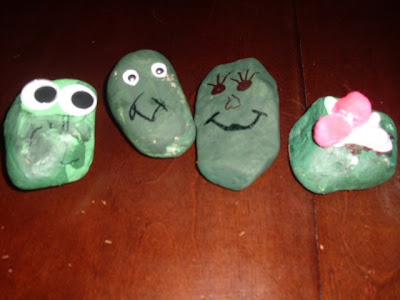
I loved this idea! St. Patrick's day is one of those holiday's, that I always wonder what to do for it? You can have a lot of fun with the color green! So we decided to make Blarney stones. And it led into painting little wooden cut outs and that lead to a big mess!! But the kids had a blast.
All we did was find some bigger sized rocks, washed them and painted them in different shades of green. We even broke out the blow dryer to dry them quickly. We decorated them with googly eye's. I have oodles of craft supplies, but this was all the kids wanted to do. I love, love, love the Geico eye's!! That was what my 5-year-old was calling them!
My 2-year-old was the only one who would kiss the Blarney Stone.
Which is awesome, because the girls needs some serious help with her speech!! I thought this was a blast and a great craft for our spring break!!

Monday, March 8, 2010

Button Issues

Okay, so I just went to put our button on my own family blog and it didn't work. I don't know if anyone has tried it today, but I fixed it and now it should work. If your intersted, please grab it on the sidebar. It's pretty stinin' cute!!

5 more Daily Reads

Photobucket


UndertheTableandDreaming


This is really an attempt to get all the blogs I visit in one place. I know I need to get the buttons on the sidebar, but that's a lot of buttons. Anyone have any ideas on that?? I'm contemplating just a list, similiar to what we have. No buttons, as cute as they are!! What do you think?
Also, I made a much cuter button!!! Grab one off the sidebar if your intersted.

Saturday, March 6, 2010

The Mortal Instruments

A few day's ago, I posted about this series. I had just finished the first book and was super stoked with it. Let me just say up front, that the books are all FANTASTIC! I thoroughly enjoyed the series. I was so sad to see it end, but it's good it did, because it has been consuming my life the past week.

I put a little note, that as always read a book if your questioning the content of the book, when looking to let your kids read it. I thought this was a great book, but I don't think it's aimed at below 16-year-old readers. I don't. The characters in the book are between 15 to 20 years old. They talk a little bit about sex, but only in passing. There is a couple of make out sessions. But it's pretty clean. They do address homosexuality a bit, but it's not a major part of the story. There is some language, but it's pretty mild. There is a MAJOR and slightly disturbing story line throughout the books, but it gets fixed in the end. You'll know what I am talking about after you finish the first book. I was glad to know that, because it made me a lot less uncomfortable through out the book.
I may have just given something away, but I felt much better after someone let me know that little secret.

The characters in the book are funny, quirky and each one has so many diffrent dimensions to them. Magnus is one of my favorites. He cracks me up. His eccentric clothes and the funny things he say's.

All in all, I loved it. It's a great story. Jace, who is one of the main characters and love interest in the book is my new fictional favorite. Like I said before, Edward, who??

Wednesday, March 3, 2010

Sloppy Joe's

I love Sloppy Joe's. They are seriously one of the easiest things to make. Especially for big family functions or church functions. And, I'm not a
Mamwhich kinda gal. I like the homemade kind. Super easy and you probably have all the ingredients on hand to make it.
Sloppy Joe's
2 lb. ground beef
onion, chopped
salt, pepper and garlic powder to taste
1/4 cup ketchup
1 tsp. mustard
4 Tbsp. brown sugar
1 Tbsp. barbecue sauce
1 Tbsp. Apple Cider vinegar
2 small cans of tomato sauce

Season hamburger meat and brown with onions. I also like to throw in some dehydrated peppers with mine. Drain grease. Add remaining ingredients and simmer for 10 minutes.

This is a good recipe to play around this. It's the base I use when I make mine, but sometimes we leave the BBQ sauce out and sometimes we don't use as much brown sugar. Just modify it to fit the taste of your family.

Tuesday, March 2, 2010

Edward, who???

So ladies and gents, this is a book review on a partially read series. Is that weird that I am sharing it with you after I have only read book 1?? Anyway if your a Twilight fan, you'll love The Mortal Instruments series. I've only read the first book, but I read that puppy in under 48 hours. It was that good. I couldn't put it down. Even at 1:30 am on Sunday morning. Book 2 is currently sitting on my table, just waiting for me to crack the cover. I know that once I start, I will have a hard time putting it down.

It's a mix between Twilight and Harry Potter. But spicier. Yes, spicier than Twilight. Okay well maybe not, but the heart throb in this book is Jace. He's a hot, bad boy demon slayer and let me tell ya, he's my new fictional boyfriend. Edward, who??? I'm hopeless, I like that bad boy image. I just hope they cast someone fitting to the part when they make the movie, unlike they did with Edward and Robert Pattinson :(.

Anyway, it's well worth the time to read. There are currently 3 books out, and I hear that she is possibly going to continue the series, but not following these specific characters. Book 1 was so good, I'm pretty sure the rest of the series will be too. If your interested, you can check them out on Amazon. I'll let ya know what I think, when I'm done.

*As alway's read books first before you let your kids read. I'm 1/3 rd of the way through the 2nd book and wow!! I know it's aimed at teens, but I don't know if it's something I would let mine read until they were older teenagers. *

Monday, March 1, 2010

Easy Peasy Cheesecake

Oh so easy!!! Seriously tasty and you probably have the ingredients on hand. And it only takes about 10 minutes to make.

Easy Cheesecake

2 (8 oz.) pkgs. cream cheese softened
1/2 cup sugar
1/2 tsp. vanilla
2 eggs
1 ready to use graham cracer pie crust

Mix cream cheese, sugar and vanilla with an electric mixer on medium speed utnil well blended. Add eggs, mix until blended. Pour into pie crust. Bake at 350 for 50 minutes or until center is almost set. Cool. Refrigerate for 3 hours.

I made my crust............

1 & 1/2 cups graham cracker crumbs
1/4 tsp. ground cinnamon
1/3 cup melted butter

Combine the graham cracker crums and cinnamon in a medium bowl. Mix in melted butter. Press into pan until even on all sides. Put the crust in the reezer until the filling is done.