Wednesday, May 12, 2010

Caterpillars

There are caterpillars everywhere in my yard. The other day we had the neighborhood kids collecting them in Mason Jars. At one point we had 28 of them. Kinda gross!

But the kids sure do love them. Today I did a fun little craft with the 2-year-olds.
Easy and these guys did it well. I had to help little Miss Mia along, but Piper, who is almost 3 did really well by herself. The only thing I did for Piper was glue the eye's on.
Grab a tongue depressor, a glue stick and some pom-poms. Simply glue pom-poms all the way down the stick. Add some googly eye's and you've got a darling Caterpillar.

Tuesday, May 11, 2010

Easy Gift Idea

Cute labels, via Domestifluff. Made these for the ladies I visit teach! So cute and so yummy! Go here for my freezer jam recipe!

Monday, May 10, 2010

Target Knock-off

Loving this! It's at Target for $40.00.
Love this even better! It's a free download from Comfort Zone! Make yourself one for under $5.00!! Plus, chose the size you want. What a great present for the teenager in your life! I'm so making one for my niece for her birthday in August!

Friday, May 7, 2010

Motherhood is a Gift

(for some reason this plays funny on the blog. You may want to go to You Tube to watch it)

She is one of my very favorite people in all the world, and I don't even know her. She inspires me, makes me laugh, appreciate my life, and makes me want to be a better mother and wife. An all around better person. If you haven't seen this yet, you need to.

Thanks Stephanie for sharing your story and your life with us. You continue to inspire and lift others with your faith and your love of life.

Have a lovely Mother's Day weekend! You deserve it!

Thursday, May 6, 2010

Lookie What We Made

Remember these? Tuesday morning, I spent my day helping make 40 of these beauties! Mandee and I are the Co-Vice Presidents on the PTO at our school. My friend Shelley wanted to make make these and practice on a few other cookies, so we figured, if were making a few, we may as well make 40!! So we had 4 of us working on these and it took us 2 and 1/2 hours, minus the baking time. Shelley cooked them the night before.
We used a egg to cut out the cookie shape and it was a bit smaller than the one on Bake It at 350. So we didn't have enough room to write popcorn on them. But they turned out way cute anyway.
I had never made royal icing, used meringue powder or floated icing. It was a whole new experience, but very fun! I think we will be dabbling in cookie decorating a bit more. Shelley and I are going to make darling graduation hats for our preschool kids at school. I'll post pictures of those when we get to that. In all our free time, ya know :).

Then the 4 of us met at the school this morning and handed these out to all the teachers and staff. Everyone loved them! Super cute idea. Thanks for Bake It at 350 for the idea!

Wednesday, May 5, 2010

I'm Not a Maid, Object Lesson

Monday brought me to a place that I hate to go. I had reached the end of my rope. I was yelling at my kids and almost to the point of tears. I was tired of cleaning my house, only to find more mess in each room and none of it my own.

We were supposed to take our kids to a movie for family home evening, but I didn't want to go. I was just frustrated. Anyone else have those days. I was trying to decided what to do, when an idea popped into my head.

I had my boys go and clean their room. Vacuum, put clothes away, and toy's too. They did a good job. That is the picture below.

Then I had them go outside and jump on the trampoline. And while they did that, I dumped out every toy in their room. I dumped out their dirty clothes and all of their shoes. Literally made a huge mess, everywhere!! It was liberating and stress relieving!
And then I closed the door and we ran to the store, fixed dinner and then I heard J.D. yelling at me from his room. He was so upset that his room was trashed. He was trying to figure out who had messed it up. Never guessing of course that it was me.

I told him, that I had done this to his room and he was so ticked. Then I asked him, "How does it make you feel?" Of course he said mad, and I said, "Well, how do you think I feel every time you and your brother make a huge mess and leave it for me to clean?"
I think the idea hit home. My husband and I helped them clean it up and we went through everything, throwing away broken toys and getting a bag full of DI stuff. It was awesome!
Then yesterday morning, my nephews came over and I hear Tyson in the back room, "Don't get out any toys or my mom will throw them away!" I think it may have sunk in!!

Friday, April 30, 2010

Another Printable Teacher Card

Another cute teacher card! Go check out Cut and Create for these cute little Apple tags!

One more Teacher Appreciation Idea

Have you ever hear of Bake it at 350? Such a cute sight! My friend Shelley turned me onto it and it is full of awesome goodies and ideas! It makes me hungry just thinking about it! We are going to make these next week! They have the toppers as a free download!

Tuesday, April 27, 2010

Teacher Appreciation Week Gifts and Ideas

The first full week of May is Teacher Appreciation Week! Teacher appreciation day is May 4th. I don't think that limiting your appreciation should be stopped at teachers, but should include the faculty at the school. The principal, the office ladies, the school counselor! Anyone who helps to ensure that your child has a healthy educational experience. That doesn't mean go crazy! Here are some fun, easy and cheap ideas I've gathered for this years appreciation week!
Sometimes it's as simple as writing a heart felt, thank you note! I know that when I feel appreciatied, it makes a big difference in my day. Cottage Industrialist has this cute and free printable apple card available on their site. Print this off, add a little note and maybe a gift card to Barnes and Noble.

No Fuss Fabulous, had this great idea! Make a pencil bouquet and give this cute and free printable card to your teacher! They also have a darling, Smore basket with a free down loadable card! Darling stuff!

Parties by Hardie has this cute little wreath and a few other great ideas!

Skip to My Lou has a huge list, of easy things that you could throw together this weekend. Also in this post, you can find some fun printable ideas. I love free printables. Always makes things so much easier!


How Does She has a great little list, with a free printable card.


Tip Junkie, has a big list of teacher gifts. And these right here, are what I will be doing for my teachers and administrators! Go check out this post, from Eighteen25, (which is my new favorite blog, by the way) and get some easy, easy ideas that you can put together this weekend and that won't cost you a fortune! I love these, because you could use them for a huge variety of events. For primary teachers, for visiting-teachers and friends. You name it. Lot's of great ideas!

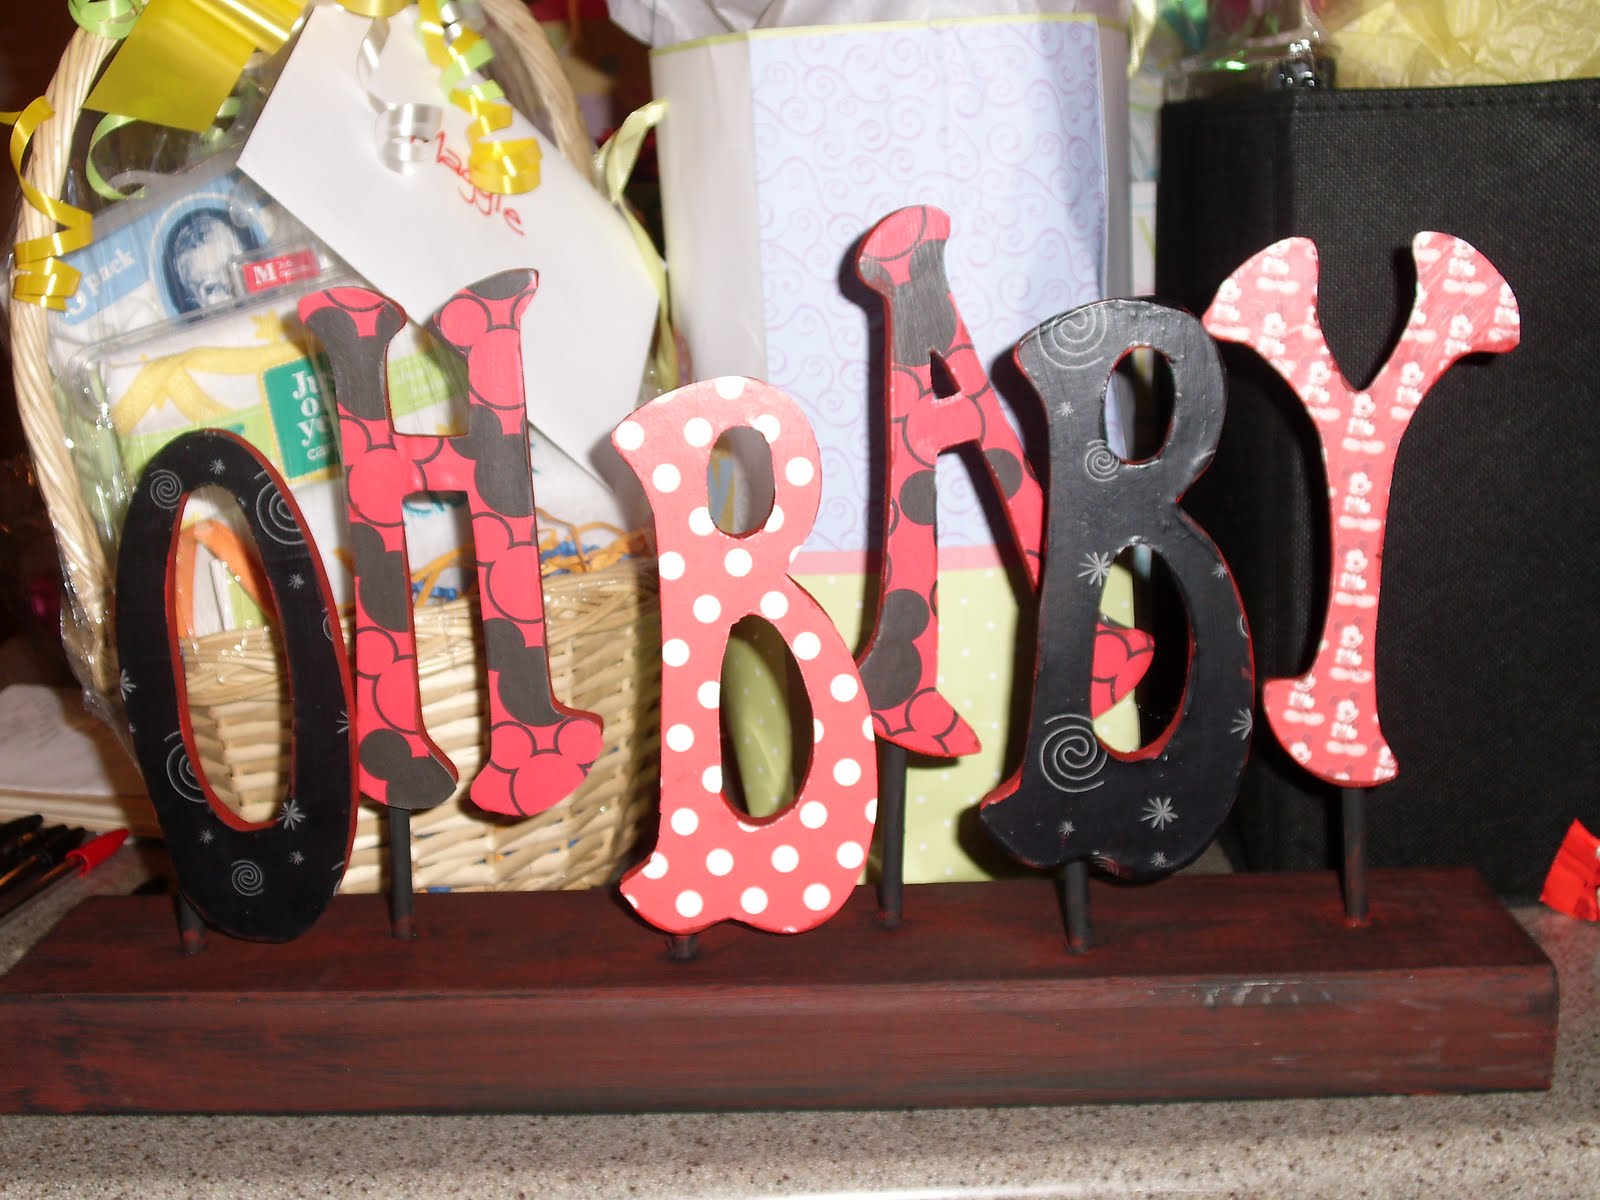
Oh Baby Centerpiece

I got the idea for this little jem at Real Parties. I took the idea and made it my own. This was a fairly inexpensive little project. I got the letters at Joannes for $1.29. Then my sister-in-law, Kris and Mandee and I got together and modge podged the letters with cute paper.

Now, I have to say, I wanted to make this in fun pastel prints so it would match the shower. But the mommy-to-be is a Mickey Mouse addict and her nursery is in Mickey Mouse. So Mandee suggested making it as a gift, so she could put it in the baby's room! Great idea! And that is the explanation for the dark colors!

I should have taken pictures of each step. Sorry! I used a 2x4 for the base and cut it 1 and 1/2 feet long. Then I sanded it a little bit. I cut the dowels, and I didn't measure them. I just cut 3 of each. Then I used a 1/4 inch drill bit to drill the holes. I laid each of the letters out and marked where I wanted to put each hole.
When you finish with that, put our dowels in and use a hammer to get a tight fit. Then I painted everything black and dry brushed a layer of red over the top of the base. I just used hot glue to attach the letters.
Super cute!!

Monday, April 26, 2010

Pinwheel Centerpieces

Our theme for this baby shower was spring.
Lot's of pastel colors,flowers and pinwheels.
Look closely at the table, there are tons of little 2 inch pinwheels on the table.
We had planned on making these for napkin rings,
but we ran out of time, so we just scattered them on the table.
It looked really cute.
The tins were empty Stephen's Cocoa Honeyville Farms smoothie mix cans.
We just modge podged coordinating paper to the tins.
So cute and easy!
To make the little pinwheels we cut the paper to 2 inch squares.
Then simply cut the four corners in at about 1 inch deep.
Then you fold the four corners down and glue them.
We used buttons to put at the center.
The big pinwheel is a 6 inch square.
We attached flat thumbtacks to the back.
We painted regular #2 pencils, for the stick.
Stick your thumbtack in the eraser and your done!
They are functional and spin.
Add some craft foam in the bottom of the tins
and top that with some shredded paper!!
These could be used for a variety of things.
Heck, my kids love pinwheels.
It's a great afternoon craft!

Saturday, April 24, 2010

I'm Linking Up


I linked up one of my fun projects. Go check out some great ideas from lot's of other talented ladies!

Oh, and just wait until next week! I've got a big baby shower today and I didn't want to post pictures of the darling things that have been made, because I didn't want the mommy-to-be to see them! There is some good stuff! See you next week!

Thursday, April 22, 2010

Pudding and Cool whip Pops


Pudding Pops:
Mix 1 small box of pudding with 2 cups of milk. . Put a small scoop into a small cup. Add a scoop of cool whip on top of that and then top with more pudding. Insert Popsicle sticks and freeze.

To eat, pull out of freezer and run warm water around the cup to release the pop from the paper cup.
We also make these and use our morning smoothies to make a healthy afternoon treat. The kids love the soft layer of cool-whip in the middle of the pop.

Wednesday, April 21, 2010

Tuesday, April 20, 2010

Pudding Chocolate Chip Cookies

These are the best cookies. So soft and sweet. I've had this recipe in my binder for years. I copied it down out of an old cook book that a friend of mine had.

Pudding Mix Cookies:

1 cup butter
3/4 cup brown sugar
1/4 cup white sugar
1 box vanilla/butterscotch pudding
1 tsp. vanilla
2 eggs
2& 1/4 cups flour
1 tsp. baking soda
2 cups chocolate chip (I do 1/2 choc. and 1/2 butterscotch)

Cream butter and sugars together. Add eggs and vanilla. Blend until well blened. Add the rest of the ingredients and stir until well blened. Bake at 350 for 10-12 minutes.

Monday, April 19, 2010

Scrapbooker's dream sale!

**** This link has been fixed! Sorry!****

Go check out this blog! This is a St. George gal, who has decided to go digital with her scrapbooking and is selling all of her supplies and she even has a smokin' deal on a cricuit!! I actually bought a few things from her and went over today and picked them up. She has so much stuff! She is willing to ship and does take paypal, so it's worth going to check out. You defienlty won't be sorry!

Saturday, April 17, 2010

DI Frame Extreme Makeover

This was pretty simple. I love this frame. I found at DI for $3.00.

I wasn't really digging the Avocado picture. So I popped out the canvas. Attempted to find some glass to fill in the frame. Which took me months, mind you. I eventually had my husband cut some down with this teeny tiny glass cutter we have.

I originally wanted to leave the frame white, because I thought it had a tone of character, but in the meantime I rearranged my living room and the white frame, just wasn't working for where I wanted it. So I sanded it down a bit, painted black over the top of it and then sanded it down to give it a vintage look.

I used some E-6000 (Walmart craft section), which is an industrial strength glue, to glue the glass into the frame. I had purchased my vinyl from Scribble It months ago and when it was all ready, simply laid the vinyl on and here is the finished product.
I am in love with it! I know the vinyl is on a bit crooked, my hubby reminds me often, but it has a lot of character. I am making something similar, but on a much larger scale from a sister-in-law. I love refurbishing DI treasures!
Take some time to go and check out Scribble It. I have bought vinyl from Cammi several times and have alway's been happy with it. I love, love, love the metal nativity, which I bought this past year! It's a great sight with lot's of fun ideas!


Friday, April 16, 2010

3-D Poppy Picture

Okay, so I made this using the Poppy's from yesterday! I think it's stinkin' cute. My husband thinks I'm a dork, but he totally helped me make it. He cut the dowel for me and even glued them into the frame. I told him I could do it, but he loves me and wants to help me with my wacky ideas!
There is no glass in the frame and it kinda pops off the wall. Hard to tell in a picture, since you can't make it 3 dimensional.

I just had the unfinished frame in my closet forever. I started this thinking about using it for a decoration for a spring baby shower, but I don't know that it is necessarily the direction we wanted to go. We have another idea for that, but I still finished it because I had started it.
What do you think?

Thursday, April 15, 2010

No Sew Felt Poppy Clips - Tutorial

These are stinkin' cute! I have made poppies out of fabric before and had them turn out okay, but it was a complicated process with using a pattern and cutting them all out and it took forever. I made 3 of these in just under 20 minutes. They are that simple. I had a friend teach us how to make these at a Young Women's activity, but she had us sewing them together. I have made some like that, but using the glue gun is so much easier and they seem to hold up the same.
Your going to need 6 circles cut out of felt, all the same size. These are 2 inches in diameter. I used a pattern that I had already made for silk flowers. Which will be hopefully posted on here next week!

Your going to take a piece and fold it in half. You may want to put a dab of glue right in the center of that crease. I don't do that on every one, but sometimes they do unfold. Up to you!

Then fold it in half again and stick a dot of glue in the fold to hold the petal in place. You will have a triangle shape petal.

Take one of your pieces of felt and put a dot of glue and glue your petal on. Repeat this step with the other 3 circles. I like to do the first two petals right across from each other and then fill in the gaps with the other 2 petals.

This isn't a great picture, but this is what it will look like. If you have any edges sticking out, you will just want to trim them off. You can leave it just like this, or.......
Glue a cute button into the center. I love buttons! Place your last piece of felt in between the prongs of your hair clip. Smother the top of the felt with hot glue and attach it to the back of your flower.
This is seriously so easy and so cute! You can use them to embellish, purses, clothes, and just about anything you want. Tomorrow I am going to show you another use for them!

Wednesday, April 14, 2010

New Moon Cupcake Picks

I made these for a baby shower! That's right folks, a baby shower. My friend Shelley asked me to help her out and make some cupcakes for a baby shower she was throwing, the day that New Moon came out.
I think they turned out way cute! I only did Edward, because both Mommies-to-be were Edward fans.

I saw the idea to use forks as the picks somewhere online. I can't remember, but it was on several different sights. We cut about half the handle off the forks off so they wouldn't be so long. I got the silhouette graphic from Pin and Paper. Everything else I made using Lettering Delights products. It is seriously one of my favorite places to get fonts and I buy the graphic kits too, because they are super cute. (And they have lot's of freebies!!) I was able to get these during their dollar day's sale! I bought all of the Twilight fonts and the Edward and Jacob graphic sets. The twilight and Team Edward picks, I just made up with my fonts.
I used a 2 &3/4 inch punch to cut them out. Then I thought they were to plain, so I just took a red and black stamp pad and went crazy smudging the edges. I think my favorite one is the Volvo, that say's "stupid shiny Volvo owner,"
I also toyed around with just putting quotes on the picks, but it just didn't feel right. I seriously agonize over making things for other people. It gives me major anxiety, but I think they turned out pretty cool!!

Tuesday, April 13, 2010

Frame a Birdie

I have a birthday this week. A big one!! Well, I think it's big, it was big enough for Mandee to throw me a surprise party this weekend! And when I say party, I mean, sit down formal dinner, slide show and the whole 9-yards. It was amazing! And I happen to be the dumbest person ever on the face of the planet. There will be pictures to come, because she and my sister-in-law's put in so much work and it was beautiful! Had I known, I would have taken my camera, but being that it was surprise, no such luck so now I am waiting on pictures!

Anyway, back to my birthday. I went home last weekend and got a few presents early. My cute sister, Sherry, made this for me! She knows I love vintage birdies and silhouettes.

She got the idea off of this post on Eighteen 25. Instead of using scrapbook paper, she used material and felt. It is darling!! So bright and springy! My brother-in-law even got involved. He sketched the birdie for me! Thanks sis!!!

Monday, April 12, 2010

Foamerator

I saw this idea on Family Fun and had to try it. They call it the Foamerator. It was simple super to make! Simply cut the bottom off of a water bottle. Then attach a piece of towel to the bottom of the bottle and secure it with a rubber band. Dip the end in water, then into a shallow bowl filled with dish soap and then blow!!
My 2-year-old loved it.
The 11-year-old loved it.
The 7-year-old sucked the bubbles into his mouth somehow and proceeded to gag and choke for at least 10 minutes.
And the 5-year-old started a bubble fight. The kids had fun throwing the big suds on each other and smearing them everywhere. I would say they played with this for over an hour.
We kept our bottles so we can play with them again. It's definitely a fun summertime activity. Next time we will break out the sprinkler and the swimsuits before we suds up!

Friday, April 9, 2010

(Sugar Free) No Bake Cookies

I'm on a quest to compile a recipe book full of healthy cookies and goodies!!! Is that possible? I made these the other day and they were so good! They don't harden up the way a normal no bake cookie does. They are pretty soft, but so good! Just a bit crumbly.

I took my original recipe and played around a bit with the measurements. I got about 18 cookies out of this patch. The almonds were an after thought, just to make it a little bit healthier! For the most part, I think this is a pretty healthy cookie!!

Sugar Free No Bake Cookies

1/4 cup butter or margarine
2/3 cup Xgave, or could use 1/2 cup splenda brown sugar
1/4 cup milk
2 Tbsp. + 2 Tsp. cocoa powder
1/4 to 1/2 cup peanut butter, depending on taste
2 and 1/2 cups rolled oats
1/2 cup sliced almonds

Melt butter in a pan. Mix in Xagave, milk and cocoa. You will need to whisk it until the cocoa is blended and no lumps are in the sauce. Bring to a boil and boil for 1 minute. Take off burner and stir in peanut butter until smooth. Stir in oatmeal and almonds. Drop by spoonfuls onto waxed paper and let cool.

Homemade French Fries & Secret Hamburger sauce

MMMMMMM! These were another Hoover's secret! Homemade, greasy french fries! Divine when dipped in the secret sandwhich sauce, which I am going to share with you today. It's so simple, it's unbelievable.

You need, Mustard, Mayo and pickle relish. I don't remember ever making it up with a recipe, it was just throw everything together and make it up until it tasted right. We would serve a thick layer of this on the bottom of the bun, a sprinkling of shredded lettuce, and then the meat. We made a mean bacon cheeseburger! Then top with the other half of the bun. No ketchup, just this famous hamburger sauce!