These would be a great craft for preschool. In fact, we may do these for our party! We took paper plates and painted them orange with tempera paint. I printed the silly faces from Family Fun. They had a great idea, to print these on sticker paper and let the kids use these to decorate pumpkins, rather than carve pumpkins, but where's the fun in that? I let each of the kids pick out their own face and glue them on. This is what we came up with. They were so easy to make and are so cute!
Saturday, October 23, 2010
Friday, October 22, 2010
Spiders
I got this idea, from here. It's one of my very favorite sights! These were originally Christmas ornaments from the dollar store. They came in packages of 8. They are styrofoam, but whatever is on top of them (glittery paint), stopped the spray paint from melting the styrofoam. They started out white and we spray painted them gray, because well, it was what we had :). You could also paint them with acrylic or tempra paint. We cut pipe cleaners and stuffed them into the styrofoam to make the legs. Add some googly eye's and you've got a cute collection of spiders.
This is a craft that is doable for preschool, but in small groups. I had to really help the two girls, who are both 3. My 6-year-old did great. This would be a great craft for a school party.
We cut pipe cleaners up and pushed them into the styrofoam to make the legs. Add some googly eye's and you've got some nifty spiders!
Thursday, October 21, 2010
E is for Elmo and Egg
Agian, these are for our ABC book. The idea came from here.
This was a last minute time filler. We had done the Cookie Monster faces, and so I thought, "Why not do an Elmo plate?" These were much simpler. Used 2 inch punches for the eyes and nose, a bingo dobber for the black in the eye's and I cute 3 inch circles in half for the mouth.
I have quite a few more E things for you!! Mostly experiments that we did. I will post more of those, possibly next week. I want to make sure to get all the Halloween projects we've been doing posted before the big day. Most of them we have been doing at home to try them out, prior to preschool, just to make sure they are doable. See you tomorrow with some fun stuff!
Wednesday, October 20, 2010
Mock Halloween Canvas
I love making these canvases. I've posted about them before. This was a big, nice canvas that I got at DI for $1.50. I painted it black, because believe it or not, it was pink!!! I printed out this fun sign, ripped the edges, and modge podged it to the canvas. It didn't turn out the way I had envisioned, but I think it looks alright. I put it on the top of my mantle, kinda of back in the back. It bubbled a bit, but from a few feet away, you can't tell! That's the perfectionist in me!
There are lots of these kind of signs floating around the web right now. Lot's of fun subway art and great Halloween printables! Good luck deciding which one to make.
There are lots of these kind of signs floating around the web right now. Lot's of fun subway art and great Halloween printables! Good luck deciding which one to make.
Tuesday, October 19, 2010
Gak
E is for Experiment!
Gak1 lb. box of cornstarch
1 & 1/2 cups water
Mix all the constarch and water together in a bowl. If the mixture is really thick, add some more water. The mixture should be slightly runny.
Here is waht is really cool about Gak. When you poke the gak quicky, putting pressure on it, the Gak particles lock together and it acts like a solid. But when you poke at it slowly, this doesn't happen and the Gak still acts like a liquid.
Monday, October 18, 2010
Easy Halloween Costumes
Haven't figured out a costume for your kiddo yet? Parenting has a great article for you! 35 Easy Homemade costumes, all you need is scissors, glue and paint! I love homemade costumes. I wish I could get my kids to stray away from the commercialized costume business. They are expensive and usually don't last long. This year I only had to buy 1 costume, thank heavens! We borrowed and came up with one for my little girl, but maybe next year I can convince them to make their own.
Today we are doing our traditional Haunted Gingerbread houses! Can't wait! It's a sticky and sweet mess! Have a good Monday!
Today we are doing our traditional Haunted Gingerbread houses! Can't wait! It's a sticky and sweet mess! Have a good Monday!
Sunday, October 17, 2010
E is for Listening Ears!
This was a really fun craft. The kids all looked so cute! I got the ear images from Dltk kids. I printed one out normal and then mirror imaged the second one to get the other ear. Have the kids cut out the ears, while you cut a paper plate in half. You will also want to take a hole punch and make 2 punches in each half, close to the top of the ear. You will thread pipe cleaner through each set and twist them in the back to make the headband. Glue on your ears and color! This is something I have seen done before, I just wasn't sure where to get the ear images.
Saturday, October 16, 2010
Yeah for more Halloween Freebies
There are way to many good ideas out in blog land! How do you pick just one? Here are a couple more great websites full of ideas. I think I'm done looking, I've found lot's of goodies and now it's time to make a few! Happy Saturday to all of you!
Amy, over at Living Locurto, has a great list going with 15 different fun printables she has found floating around on the web. Everything from cupcake toppers to invitations to banners! She also has a second page full of fun crafts and free printables! This sight is a cauldron full of Halloween fun!
Friday, October 15, 2010
Great Hallowen Freebies
The web is full of great Halloween ideas! I have been finding them everywhere. There is also a lot of freebies out there. Just wanted to share 2 that I have downloaded with you.
Have you ever seen the blog, Lawteedah? It's my new favorite blog. She has a ton of great ideas for preschool!! I spent a long time today going through the whole blog! She has this great free download kit that has some fun activities. I made up the puzzles and the memory game today. Can't wait to play them with the kids over the next few weeks. We will be using them for the preschool and my Kindergartner's school parties!
This fun freebie is from Green Jello and Carrots! It's a Friday only freebie so it ends tonight at midnight!
Wednesday, October 13, 2010
Paper Bag Scarecrow
These are easy. I made them up over the weekend to see how hard it might be for preschoolers. This is definitely not one to do with the preschool kids, but 1st grade up would be fun. I got the idea out of my Family Fun, Boredom Buster book.
Take a brown paper bag. Use crayons to draw on a face. Stuff the inside with newspaper and then staple shut. Use raffia (couldn't find mine) for hair and the hat I printed off from Lakeshore. We tried making these with precut shapes, but the face just didn't look right. They looked like rabbits :).
My older kids (nieces, nephews and neighbors) enjoyed it.
Tuesday, October 12, 2010
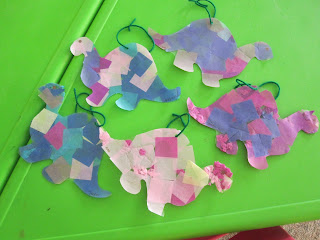
D is for Dinosaurs
We made dinosaurs, out of letter D's. This is for our Alphabet book. The idea came from, here.
These are suncatchers. I honestly don't remember where I saw this, but I did get the idea from the web. Google the image that you would like to use and trace it out on contact paper. Cut out the shape, peel off the protective paper and let the kids adhere tissue paper to the design. We used pre-cut tissue paper from Lakeshore Learning. You could cut out crepe paper or tissue paper, but that would be a heck of a job. Punch a hole in the top and use string to make your hanger.
This was a lot more involved that I thought it was going to be. I won't do this again next year. In a small group of maybe 4 of 5 kids it would be great. We even did it as a center, but after 13 kids had done it, it was super labor intensive. You have to go back and trim the excess tissue paper off and some of the kids, didn't understand the concept of filling in all the blanks with tissue paper.
But if you want to do this at home with your own kiddo's, it's super cute. I am thinking about having mine make Jack-o-lanterns. Super cute!
Monday, October 11, 2010
D is for Donuts
Super cute and super easy!
We ate donuts for snacks this day!
This is actually a felt food pattern that I found
on Skip to My Lou.
Click here to get the template.
You can't see it, but I had the word, Donut typed out
in the dot font at the bottom.
So easy and so cute!
Friday, October 8, 2010
C is for Cookie Monster and Clown
We started out by painting a paper plate blue. We used textured rollers to actually make the paint look like cookie monsters hair. We did this in our first center and then let them dry during recess and finished them in our second set of centers. We used a 2 inch punch to punch out white cardstock for the eye's. Of course you could use black circles for the eye's rather than the pom poms. I drew the mouth and cut out. The cookie was made out of a 2 & 3/4 inch punch. The chocolate chips from brown paper and a regular sized hole punch.
This one was fun. The shapes that make up the face are foam shapes. We had the kids sort through and pick out the shapes. Add a hat and some crinkley paper and wala, you have a fun clown face!
Thursday, October 7, 2010
Catepillars, Crabs & Candy Corn
Somehow, I forgot my camera on B Week.
So we are skipping to C
This is an old stand by. We made Caterpillar's with pom-poms and popsicle sticks. I think we've done this every year. Check out Confessions of a Homeschoolers page for tons of Caterpillar activities. We used a bunch of these this past week! We are using lots of her pages in general.We made Clumsy Crabs for our Alphabet book!
This was just a filler idea. I found a candy corn template and let the kids cut it out and glue it onto the construction paper. It is amazing, how hard of a skill, cutting is, for kids to master. We cut several times a week. Then we let them glue on random designs with candy corn. Easy peasy!
Tuesday, October 5, 2010
A for Alligator
Preschool is in full swing. I thought I would share a few ideas that we have done in the past few weeks.
Every year we make an alphabet book for the kids to take home at the end of the year. I stumbled across this fun alphabet idea and we decided to roll with it and let the kids do one of these for every letter of the alphabet.One thing that we are doing to help them learn their name is that every day we have a writing center. Usually 2 writing centers, but this is one of them. I bought the font at Lettering Delights. I made each child a template that has their name and on the back side the ABC's. We put them in page protectors and each day the kids use dry erase markers to practice writing their name and the alphabet. It's working great! My 3-year-old who is the youngest in the class, can just about write her name.
I'll be sharing more ideas tomorrow!
Monday, October 4, 2010
Candy Corn Wreath
I saw this idea in the recent issue of Woman Magazine. It's super easy. I got the wreath at the dollar store and painted it black with acrylic paint. They used black duck tape on theirs, but I already had paint, so it was one less thing to buy.
Once your wreath is dry, use a little hot glue and start gluing your candy corn around the wreath. Start at the same place with each layer. That way if you have any blank spaces it will all be in the same spot. This is where you will put your ribbon at the end.
With every layer of candy corn you will want to change the direction they are facing.
Tie some pretty ribbon around it and you have a fun Halloween wreath. I am not loving the orange ribbon. I am envisioning some wide, black, glittery ribbon, so I will probably go and get it today and change it out. I found all the stuff I needed to make this at the dollar store and spent $3.00 for a cute wreath!
Saturday, October 2, 2010
I'm Back!!
I've been so busy and I'm so tired, but next week I will be back with some fun crafts for your kiddo's and maybe, just maybe one for you ladies. It's on the books for today, anyway!
Thanks for still following us, even when we've been absent from the blogesphere!! See you next week!
Subscribe to:
Comments (Atom)


